ENIGMA
Page 1 sur 1

ENIGMA
par Admin Jeu 23 Mar - 21:00
.
How does an ENIGMA Machine work ?
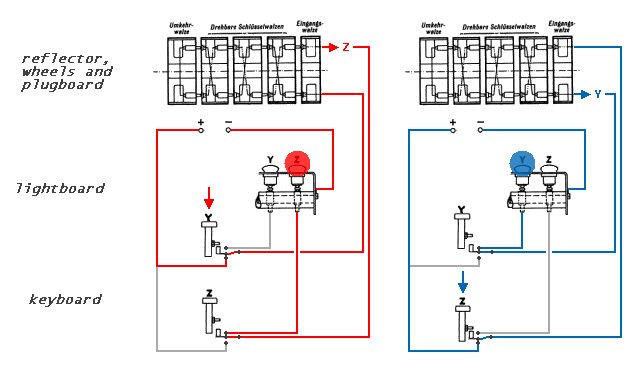
Suppose the Y button is pressed. Current is connected up to the rotors. The three rotors make a 'random' connection through to the reflector, and then back, where the circuit continues in the dashed wire (emerging from the rotors at the top right). The return wire connects (in this case) to the Z button's switch, where it is connected through to the Z lamp. All lamps have a common return to the - (negative) battery connection. So for these rotor positions (and plugboard connections), if Y is pressed Z lights ; and if Z is pressed Y lights.
Thus, if you type your encrypted message with the same settings, you get the original message !
Another illustration :
from : http://enigmamuseum.com/em.htm
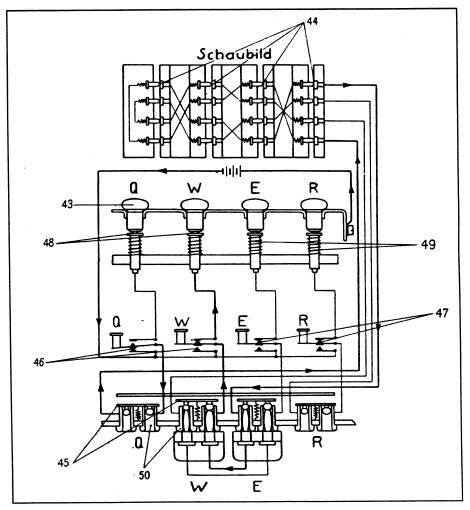
Q is pressed, W lights.
Clockwise from top :
(44) Rotor Contacts
(49) Lamp Contact Springs
(47) Key Contacts N. C.
(50) Jacks in Patch Panel
(45) Bypass Contacts for Unused Jack Panel Sockets
(46) Key Contacts N. O.
(48) Lamp Contacts
(43) Light Bulbs
Now, if Q and E are connected together on the plugboard, does a disaster happen ? Not at all ! Have a look to the picture on the left :
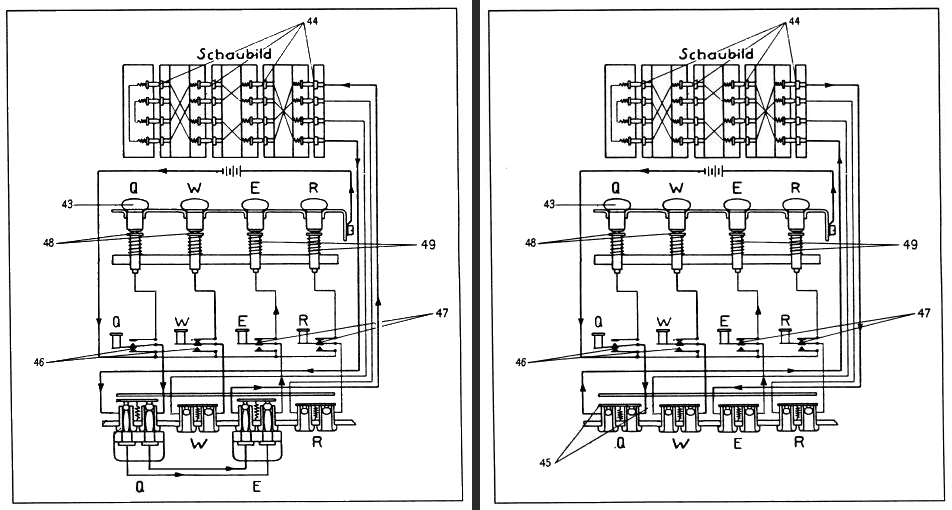
When Q is pressed E lights ! Exactly as if there were no connections on the plugboard (picture on the right) !
Do you understand now why there are 2 holes for each connection on the plugboard ? :-)
.
Dernière édition par Admin le Mar 4 Avr - 0:37, édité 5 fois

Admin- Admin
- Messages : 104
Date d'inscription : 11/07/2016
Localisation : FRANCE -

The wheel's parts
par Admin Jeu 23 Mar - 21:00
.
(2) Notched ring
(3) Alphabet ring
(4) Finger wheel
(1) Plate contacts ring
(5) Ratchet wheel
(6) Pin contacts ring
(7) Wire connections
(8) Spring-loaded ring adjusting lever
----
This last component (8) allows you to adjust the position of the rotable alphabet ring with its notch (2+3), relative to the position of the internal wiring. This is called the ring setting (Ringstellung). Changing the ring setting will therefore change the positions of the wiring relative to the turnover-point and start position.
This is what you do at step 1.c. (see below).
----
Wikipedia is wrong when saying that "the notch or the alphabet ring on the exterior are fixed to the rotor."
.
Dernière édition par Admin le Mer 5 Avr - 16:01, édité 3 fois
Admin- Admin
- Messages : 104
Date d'inscription : 11/07/2016
Localisation : FRANCE -
The rotors' advance
par Admin Jeu 23 Mar - 21:07
.
From the Enigma simulator pdf :
"The rotors appear to work as a normal odometer, with the right-most rotor always stepping on each key stroke and the other rotors stepping after a complete cycle of the previous rotor, but there is an important difference due to the system of pawls and teeth. The middle rotor will advance on the next step of the first rotor a second time in a row, if the middle rotor is in its own turnover position. This is called the double-step. Below and example of such a sequence when the rotors III – II - I are used :
KDO KDP, KDQ, KER, LFS, LFT, LFU …
As you can observe, stepping from Q to R advances the middle rotor, and on the next step that middle rotor steps again, advancing the third rotor also. This is caused by the mechanical design of pawls and teeth."
How does it work ?
"There are three pawls that are all three activated on every key stroke (1). Each pawl is half positioned on the index ring (2) (carrying a notch (4)) of the rotor on its right, and half positioned above the 26 teeth of the rotor on its left (3) (viewed from the point of the operator). A rotor’s ring (2) prevents the pawl from pushing into the teeth of the next-left rotor. When a notch occurs in a ring, the pawl can drop into that notch and push into the teeth of the next-left rotor. Since the right-most pawl is not above an index ring it will continuously advance the right-most rotor.
Once the right-most rotor has stepped and the middle (spring-loaded) pawl can drop down in the right rotor's notch, it will engage the middle rotor's teeth, pushing the middle rotor one step. An identical event will take place when the middle rotor's notch enables the third pawl (the left one) to drive the teeth of the left-most rotor.
A rotor will not only advance if its teeth are catched, but also when a pawl pushes into its notch. This situation creates a double-step of the middle rotor : the right rotor steps and the middle pawl takes the middle rotor one step further. If the middle rotor has moved by this step into its own notch position, then, on the next step, the right-most* pawl catches the teeth of the right-most* rotor, but the same pawl also pushes the middle rotor one step further, moving it a second time in a row.
Note that a double notched rotor in the middle position will also have two double steps. "
----
* The pdf is wrong : replace "right" by "left".
.
From the Enigma simulator pdf :
"The rotors appear to work as a normal odometer, with the right-most rotor always stepping on each key stroke and the other rotors stepping after a complete cycle of the previous rotor, but there is an important difference due to the system of pawls and teeth. The middle rotor will advance on the next step of the first rotor a second time in a row, if the middle rotor is in its own turnover position. This is called the double-step. Below and example of such a sequence when the rotors III – II - I are used :
KDO KDP, KDQ, KER, LFS, LFT, LFU …
As you can observe, stepping from Q to R advances the middle rotor, and on the next step that middle rotor steps again, advancing the third rotor also. This is caused by the mechanical design of pawls and teeth."
How does it work ?

"There are three pawls that are all three activated on every key stroke (1). Each pawl is half positioned on the index ring (2) (carrying a notch (4)) of the rotor on its right, and half positioned above the 26 teeth of the rotor on its left (3) (viewed from the point of the operator). A rotor’s ring (2) prevents the pawl from pushing into the teeth of the next-left rotor. When a notch occurs in a ring, the pawl can drop into that notch and push into the teeth of the next-left rotor. Since the right-most pawl is not above an index ring it will continuously advance the right-most rotor.
Once the right-most rotor has stepped and the middle (spring-loaded) pawl can drop down in the right rotor's notch, it will engage the middle rotor's teeth, pushing the middle rotor one step. An identical event will take place when the middle rotor's notch enables the third pawl (the left one) to drive the teeth of the left-most rotor.
A rotor will not only advance if its teeth are catched, but also when a pawl pushes into its notch. This situation creates a double-step of the middle rotor : the right rotor steps and the middle pawl takes the middle rotor one step further. If the middle rotor has moved by this step into its own notch position, then, on the next step, the right-most* pawl catches the teeth of the right-most* rotor, but the same pawl also pushes the middle rotor one step further, moving it a second time in a row.
Note that a double notched rotor in the middle position will also have two double steps. "
----
* The pdf is wrong : replace "right" by "left".
.
Dernière édition par Admin le Jeu 23 Mar - 21:48, édité 2 fois
Admin- Admin
- Messages : 104
Date d'inscription : 11/07/2016
Localisation : FRANCE -
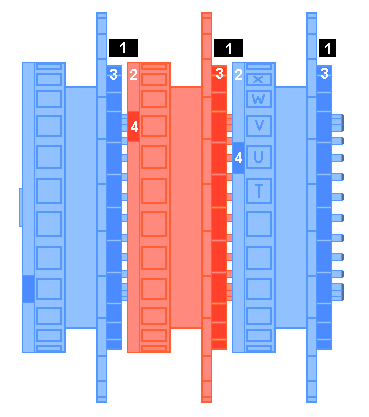
A nice video on how the rotors are moved in an Enigma replica :
par Admin Jeu 23 Mar - 21:13
.
Link = https://drive.google.com/file/d/0B5FtHgysTK7aa3I2cFU2S3JvdVU/view?usp=sharing
----
In order to comment this video in an easy way, i'm going to use this symbolisation :
24- is a position without a notch, the – on the right represents the ratchet ring (with the teeth)
-25- is a position with a notch, the – on the left represents this notch
** and * represent the pawls
each line represent a different position of the rotors after a key stroke.
----
01:16 : a single rotor advance.
01:27 : you can hear 2 clicks, one is due to the right pawl engaging in the right rotor's ratchet ring, and the other is due to the middle pawl engaging in the right rotor's notch and middle rotor's ratchet ring.
01:29 : two rotors turn.
01:37 : one rotor turn
----
01:59 : the so-called "double-step".
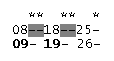
Wrong, that's NOT a double step !
This configuration NEVER happens during the normal rotors' advance, it's only possible in the case where the rotors are placed manually in this configuration before starting to tape on the board.
08 18 25 is a forced position.
Why ? let's see what could have been the previous rotors' position :
1) if you start with 08 18 24, then :

the middle rotor has moved twice, but that's a false double-step (08 18 24 is also a forced position) : why ? because if you start with 08 18 23, then there is no double-step :
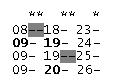
2) now, if you start with 08 17 25, then :
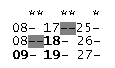
that's a real double step : if you start with 08 17 24, then the same double-step occures :

----
Conclusion : a double step appears only when the right rotor makes the middle rotor turn on a letter with a notch (18 in this case) which makes the middle and left rotor turn on the next rotors' advance. So, the middle rotor has turned twice : first time because of the right rotor's notch, and second time because of its own notch.
Note that the false double step is inversed compared to the real one: the middle rotor moves first because of its own notch (which also makes move the left rotor), then because of the first rotor's notch.
.
Link = https://drive.google.com/file/d/0B5FtHgysTK7aa3I2cFU2S3JvdVU/view?usp=sharing
----
In order to comment this video in an easy way, i'm going to use this symbolisation :
24- is a position without a notch, the – on the right represents the ratchet ring (with the teeth)
-25- is a position with a notch, the – on the left represents this notch
** and * represent the pawls
each line represent a different position of the rotors after a key stroke.
----
01:16 : a single rotor advance.

01:27 : you can hear 2 clicks, one is due to the right pawl engaging in the right rotor's ratchet ring, and the other is due to the middle pawl engaging in the right rotor's notch and middle rotor's ratchet ring.
01:29 : two rotors turn.

01:37 : one rotor turn

----
01:59 : the so-called "double-step".

Wrong, that's NOT a double step !
This configuration NEVER happens during the normal rotors' advance, it's only possible in the case where the rotors are placed manually in this configuration before starting to tape on the board.
08 18 25 is a forced position.
Why ? let's see what could have been the previous rotors' position :
1) if you start with 08 18 24, then :

the middle rotor has moved twice, but that's a false double-step (08 18 24 is also a forced position) : why ? because if you start with 08 18 23, then there is no double-step :

2) now, if you start with 08 17 25, then :

that's a real double step : if you start with 08 17 24, then the same double-step occures :

----
Conclusion : a double step appears only when the right rotor makes the middle rotor turn on a letter with a notch (18 in this case) which makes the middle and left rotor turn on the next rotors' advance. So, the middle rotor has turned twice : first time because of the right rotor's notch, and second time because of its own notch.
Note that the false double step is inversed compared to the real one: the middle rotor moves first because of its own notch (which also makes move the left rotor), then because of the first rotor's notch.
.
Admin- Admin
- Messages : 104
Date d'inscription : 11/07/2016
Localisation : FRANCE -
How to code a message with Enigma ?
par Admin Jeu 23 Mar - 22:05
.
Enigma Simulator download link : http://users.telenet.be/d.rijmenants/en/enigmasim.htm
WARNING ! This tutorial only explains the Wehrmacht encoding procedure. The Kriegsmarine used a far more complexe procedure.
1. How to configure your Enigma machine ?
Let’s say that the date is March 11, 2016. Look at the code table (see the link above "Current code-sheet") to find the enigma key.
* Tag = Day of the month (in real life)
* Walzenlage = Enigma rotors
* Ringstellung = Ring settings for each rotor
* Steckerverbindungen = Plugboard settings
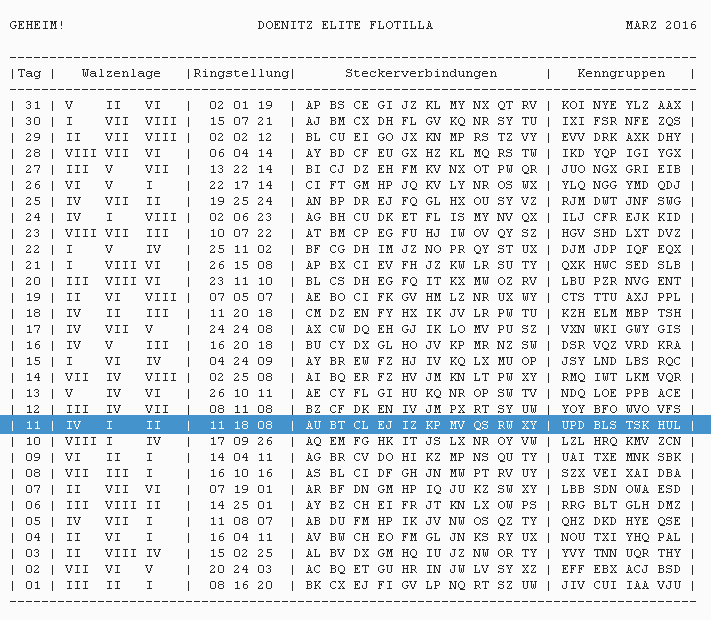
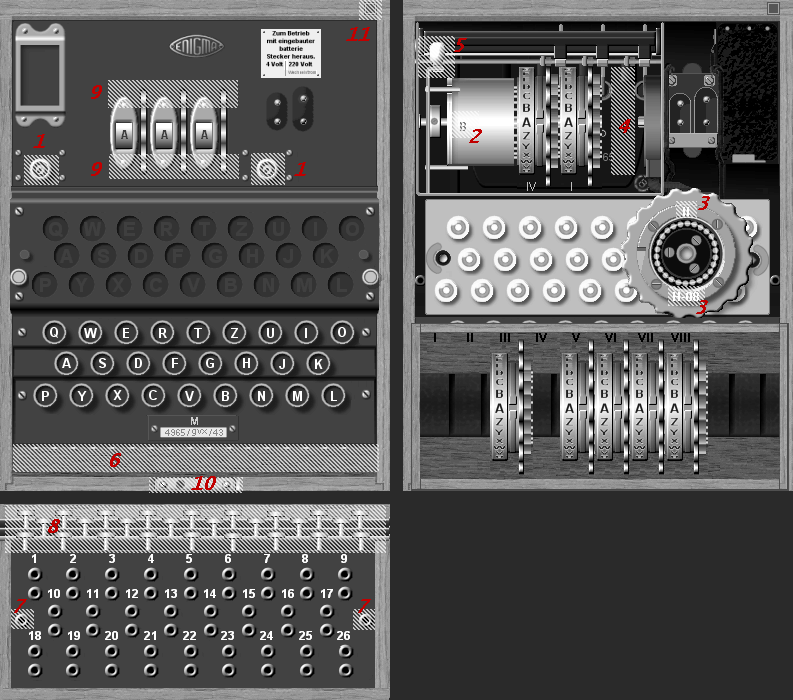
a. Open your machine (1). Don’t forget to choose the right type (2) (cf. DEF rules).
b. First take out the 3 smaller "wheels" in the Enigma. Click on each one at the top, and it moves to the middle, then click on the bottom of the Enigma, and it moves down.
c. Click on the rotor IV (Walzenlage), then click on 3 to choose K-11 (Ringstellung, see the code table), then place it at the proper place. Do the same for rotor I (18) and II (08).
d. Then close the machine (5), click on 6 to set the plugs (Steckerverbindungen). Click on 7 to get letters. Then click on A and then on U to connect both letters. To the same with the other groups.
e. Close the plugboard by clicking on 8.
2. Determine the start position with your trigram
a. Choose 3 letters completely at random. For ex, we choose ABC. Set the rotors’ position on A B C (9).
b. Choose 3 other letters at random (example: ZZZ). Type them on the keyboard. You got 3 letters. Click on 10 to see them. You got R Y N.
c. Now, set the rotors’ position on R Y N (9). You got the start position to encrypt your message. This start position is encrypted by the trigram ABC ZZZ.
3. Encode your message
a. Click on 11 and choose “Auto Typing”.
b. Copy and paste your message. For example : Returning to base
c. Choose “Very fast” and click on “Start”.
d. Click on 11 again, and choose “Clipboard”.
e. Check “Copy as groups”, and choose 4 letters for each group. Then, click on “Apply New Format”. You got the encrypted message : TMLG UGOW MYQV VFG
4. Send your message
Now, before sending your message, you have to give several informations.
a. Date and hour in the game.
b. Your U-Boot number and the recipient (from ... to ...)
c. The trigram ABC ZZZ, so the receiver is able to find the start position (RYN which needs to stay secret).
d. A group of five letters before your message. This special group is formed with one among the four groups of 3 letters called Kenngruppen (right column of the table) and with 2 random letters that you place before or after the Kenngruppe you have chosen. For example, i choose BLS, and i add RG, i get RGBLS or BLSRG. This group allows your recipient to check that you have used the settings of the proper day (BLS is indeed associated with March 11, 2016).This precaution is needed because we are players from different countries with different hours. So if i receive a message on March 11, maybe the sender has used the settings for March 10, or March 12.
Warning ! To avoid confusion, the Kenngruppen of the previous or next day MUST NOT include RGB (if you choose RGBLS) or SRG (if you choose BLSRG) ! If so, choose another random letter(s) instead of RG, such as RABLS or TGBLS (and again, make sure that RAB or TGB are not one of the Kenngruppen of the previous or next day).
February 12, 1941
From U-54 to BdU
ABC ZZZ
RGBLS TMLG UGOW MYQV VFG
Signed : K. z. S. ...
.
Dernière édition par Admin le Jeu 23 Mar - 22:14, édité 4 fois
Admin- Admin
- Messages : 104
Date d'inscription : 11/07/2016
Localisation : FRANCE -
How to decode an encrypted message ?
par Admin Jeu 23 Mar - 22:09
.
a. Check the real life date of the message. Find the Kenngruppe (here BLS) and check if it’s corresponding to this date (BLS is for March 11, 2016 → OK). Then, configure your machine with the proper settings (follow step 1.)
b. Set the rotors at ABC (9).
c. Type ZZZ, and you get the start position RYN.
d. Set the rotors at RYN (9).
e. Click on 11 and choose “Auto Typing”.
f. Copy and paste the encrypted message, without the first group of 5 letters : TMLG UGOW MYQV VFG
g. Choose “Very fast” and click on “Start”.
h. Click on 11 again, and choose “Clipboard”.
i. Uncheck “Copy as groups” and click on “Apply New Format”. You got the decrypted message ! : Returningtobase
Notes :
- Before closing the Enigma Simulator, you can save the current Enigma key. Click on 11 and choose “Save key”.
.
Admin- Admin
- Messages : 104
Date d'inscription : 11/07/2016
Localisation : FRANCE -
Page 1 sur 1
Permission de ce forum:
Vous ne pouvez pas répondre aux sujets dans ce forum|
|
|